The grease trap needs to be cleaned frequently. If you don’t, there’s a possibility that the grease will continue to accumulate and pose a serious fire concern. Grease often ignites quite quickly. If it ignites, there is a possibility that it will spread throughout the kitchen, costing thousands of dollars in damage. Additionally, grease may be harmful to the environment. Grease has the potential to harm the local ecosystem if it leaks into it. Make sure the grease trap is kept clean if you want to reduce these dangers. Let’s examine some of the procedures you must follow to do this.
1. Remove the Grease Trap
To remove the grease, you must first pry the grease trap out of the way. You must move very gently while you do this. In most instances, there will be gaskets under the sink connecting the grease trap to the sink. Damage to these can be expensive to repair, and reconnecting the grease trap after cleaning it might be challenging.
2. Photograph the Grease Trap
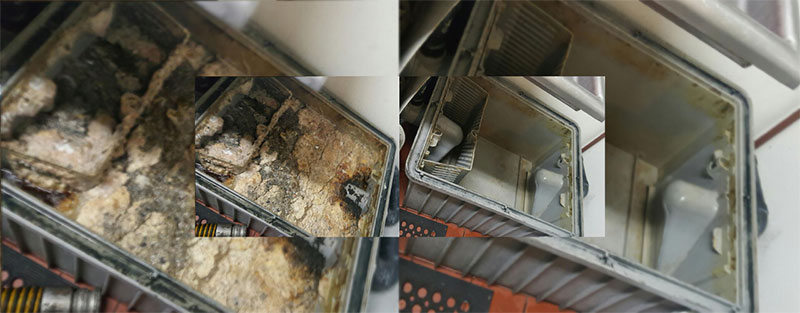
You should inspect the grease trap after removing it. Look at the locations of each component. A few photos of the trap are frequently a good idea. You may make sure that you can appropriately reassemble it by doing this. Taking a peek at the instruction manual is another smart move.
3. Measure the Amount of Grease in the Tank
Inserting a wooden ruler is the next step that you must take. To insert the ruler into the bottom of the tank and determine how much oil is inside, you might need to slightly shake the tank. You must include the quantity of grease in the trap in the FOG report once you are aware of it. Because of the EPA, this information is a fundamental legal need. You must complete the FOG report after finishing the grease report. You must mail it to the account’s listed address. If you select a reputable business, they can assist you with these legal obligations, ensuring that you are compliant and preventing a fine.
4. Remove Water and Grease
You can begin cleaning the trap once you have calculated the amount of grease. In this instance, you must first remove the standing water using a bucket. This needs to be stored a lot while the grease is being removed. You can then pour it back into the tank once you’re done.
After the water is gone, you can start removing the iced-up oil. You might need to scrape down the tank’s sides to accomplish this. This grease will clog the pipes if it is allowed to drain down the sink. Repairing this damage may be pricey. You must instead place this in a bag that can be sealed. You must choose a bag that will be sturdy, making certain that it won’t leak.
5. Use Soap to Clean the Trap
You’ll need to do a more thorough clean after you’ve eliminated as much grease as you can. You’ll need to use soap and water to accomplish this. The tank can be cleaned with a gentle cloth. You might need to use steel wool to remove more accumulated grease. All of the residual dirt will be removed throughout this process. Once you’re done, you’ll need to drain the grease-containing water. So, pouring it down the drain won’t be secure. You must take out any screens that are in the grease traps. This usually requires you to unscrew them. After that, you should run water through them, which should cause the grease to dissolve.
6. Reassemble and Re-Install the Grease Trap
The trap will then need to be put back together. You might want to consult the prior pictures you took while doing this. You can be confident that everything will be placed correctly after this process. After that, you must reinstall the grease trap.
7. Safely Remove the Grease
You’ll need to deal with the grease you removed after reinstalling the grease trap. There are a few possibilities in this situation that you might wish to investigate. You might be able to convert it into a biofuel, for instance. Even while you can do this yourself, hiring a reputable provider is much simpler. They might also provide you a little rebate to help with operating expenses. In some circumstances, it could be necessary to freeze the grease before disposing of it. You must confirm the regulations in your area to avoid receiving a citation because not all cities permit this.
8. Monitor the Grease Trap
After completing this procedure, you must keep an eye on the grease trap to determine when it has to be cleaned once more. The water might not be draining properly if the grease trap becomes clogged. When the trap starts to emit a bad odor, it’s another sign that it needs to be cleaned. The size of the trap will determine how often you need to clean it. You might need to clean it once every several weeks for smaller traps. You’ll need to clean larger traps on a periodic basis.
Conclusion
Cleaning the grease trap is a crucial component of kitchen upkeep. As we’ve seen, it’s frequently a labor-intensive procedure that demands some effort. Even though you can do it yourself, you might prefer to hire a cleaning service. You can be sure that everything was done correctly with this approach. Contact the staff at Grand Natural Inc to find out more about how we can assist you with grease trap cleaning.